To redisplay the Setup Wizard select File > Options, Other, Email Software Options, Email Software Wizard.
MailList King Setup Wizard
|
|
The Setup Wizard
configures the main options in MailList King. You can change these and
other settings under File > Options.
To redisplay the Setup Wizard select File > Options, Other, Email Software Options, Email Software Wizard. |
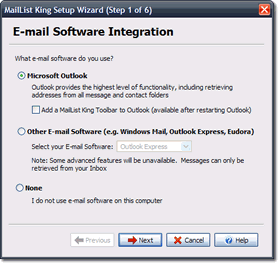
These are the steps of the wizard:
For the best integration,
we recommend using Microsoft Outlook with MailList King (the main difference
is that MailList King can access any e-mail or contacts folder in Outlook,
but only the Inbox of other e-mail software.
2. Mailing List Retrieval Method
One of the main features of MailList King is
maintaining a list of people who want to receive messages from you. To
do this it automatically processes the email requests you receive from
people wishing to add or remove themselves. You
need to advise where these messages will be found. The
easiest option is simply to have MailList King connect to your email software
and read them from your Inbox or other folder, but advanced users may
want to create an email account solely for mailing list messages and MailList
King will connect directly to your mail server.
3. Specify the Outlook folder which MailList King will check for Mailing List messages (Outlook Integration Option)
When you select "Home"
> Check Now, MailList King will open Outlook and process all the messages
in the specified folder, checking for subscribe and unsubscribe commands
(as well as undeliverable message warnings, etc, as you may set under
Options). Advanced users should create
a folder specifically for use by MailList King and use Outlook
rules to automatically move relevant messages into the folder.
In this way your Inbox will not be cluttered with mailing list messages.
4. Specify the settings of your POP Mail Server (POP Retrieval Option)
If you have specified the option to retrieve messages directly from a mail server, you will need to specify the server address and your username and password.
NOTE: It is not recommended
that you use the same POP account as for your general mail. You
should create a POP account dedicated solely to your mailing list messages.
5. Specify your Sending Method
The
other important feature is sending messages to your mailing list and MailList
King offers a variety of sending methods to
do this. The easiest option is to have MailList
King connect to your favorite email software and send them from there
(as if you have sent them yourself) as it requires no setup at all. Advanced
users may prefer to send via the mail server of your ISP or company (which
is the fastest method), or directly to the recipient using the built-in
SMTP Server (to avoid using your ISP's mail server and thus any limitations
they impose).
6. Specify your SMTP Settings (SMTP Sending Option)
If you have specified the SMTP sending option then you will need to specify your SMTP server details (alternatively you can do this under File > Options, Sending).
You can look up your
SMTP server details in your e-mail
software.
7. Sending Options
Specify the address that appears in the From box of the messages you send. It will be used if a recipient chooses to reply to a message and also for sending of delivery failure reports.
Also choose whether MailList King sends each of your message individually to each recipient or batches them with multiple recipients per message (hidden in the Bcc field). If your list is not large it is recommended to send each message individually (it looks better to recipients and you can personalize the message with fields, such as their name). If you have a large mailing list you should use the multiple recipients option as it will make your sending much faster.
If you choose the multiple
recipients option you should specify a "To Address" which recipients
will see in the To field of messages. It looks more professional
to specify an address rather than having a blank To field. For example,
you might specify a generic address of your company, such as customerlist@mycompany.com
(which just goes to an unmonitored mail account)
8. Finish
You have now configured MailList King's main settings. What are your next steps?
Import addresses from a Text, CSV or Excel file
Synchronize with Outlook Contacts
Add addresses of people who have emailed you
See Also