 |
Project Properties |
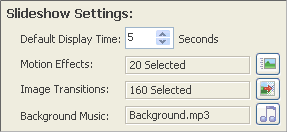
General settings for your slideshow are displayed on the right of the main window.

You can configure the display time for any frames that do not have a custom interval specified. You can also click one of the buttons for quick access to the relevant tab of the Slideshow Properties dialog.
The Slideshow Project Properties dialog allows you to configure the settings that affect all frames in the slideshow. To display the dialog select Edit > Slideshow Properties from the menu (or click Ctrl+Shift+Enter).
There are five sections:
Modify the name and default display time for the slideshow. You can also specify the color of the borders that are displayed when images are not the same ratio as the screen (e.g. a portrait image displayed on a landscape screen). Users of the Professional version can specify a company logo that is displayed throughout the slideshow.
Other Settings
Loop Slideshow
Specify whether the slideshow will loop infinitely (i.e. whenever it reaches the end it will restart from the beginning) or will only playback the slideshow once and then stop
Note: This setting is only used for DVD and
PC format slideshows. It is not supported by VCD
and SVCD slideshows
Background
Specify the color or texture that is shown in the border area of the screen
Motion effects add interest to the display of static images by making them appear that they are moving. Specify the motion effects that you like, and as images display a random motion effect will be used from those that you have selected.
If you wish to select a specific motion effect for each image, you can set it in the bottom right of the main window or using Frame Properties.
Title pages and images with added text can also use reveal effects to animate the objects they contain.
Transition effects are displayed as the slideshow progresses from one image to the next. Specify the transition effects that you like, and as images display a random transition effect will be used from those that you have selected.
If you wish to select a specific transition effect for each image, you can set it in the bottom right of the main window or using Frame Properties.
This tab allows you to choose the sound files that DVD PixPlay will play while your slideshow is being displayed. Your music files will need to be in MP3, MP2, WMA, WAV or AC3 format. Tracks from CD music disks can also be added.
 |
Play the selected sound file |
 |
Browse your computer for more sound files to add (MP3, WMA or WAV format) |
 |
Rip a track directly from a music CD |
 |
Record your own commentary for the slideshow |
 |
Promote the selected sound file (plays it sooner in the play list) |
 |
Demote the selected sound file (plays it later in the play list) |
 |
Automatically stretch the display times for your frames so they complete at the same time as the selected music files (you can also do it automatically when you burn your slideshow) |
 |
Remove the selected sound file from your play list |
| Audio Playback | Specify
your preferred playback method:
|
If your project contains video files you can choose to play the video soundtrack or replace it with audio. If you specify the video soundtrack option you can still select music files that will play while images are being displayed
DVD PixPlay offers two methods to add text to the photos in your slideshow.
For absolute control over text placement and add shapes and clip art you can select the image and click "Add Text"
Frame Captions is the second method, which offers a faster way by adding text in the same position and same style to each frame. You can choose from standard text such as filenames or dates, of you can choose the custom text option and specify the caption in the bottom right of the main window.
Note: Captions are not added to title pages or images that you have already added text to (using the "Add Text" function). Only custom captions are added to video files (select "Custom Text for each frame" and specify a caption at the bottom right of the main window)
Also