
|
Burning Multiple Slideshows to Disk |
If you have a number of slideshows or video files it can be useful to burn them all to a single disk and offer a menu to allow viewers to choose a slideshow to display. This option is available using the "Multiple Slideshow" wizard. The disk will be created in standard DVD video format to give it the widest compatibility with DVD players.
Before you begin you will need a selection of slideshow projects (created in DVD PixPlay) and/or video files.
To start the wizard select File > Burn Multiple Slideshows to Disk.
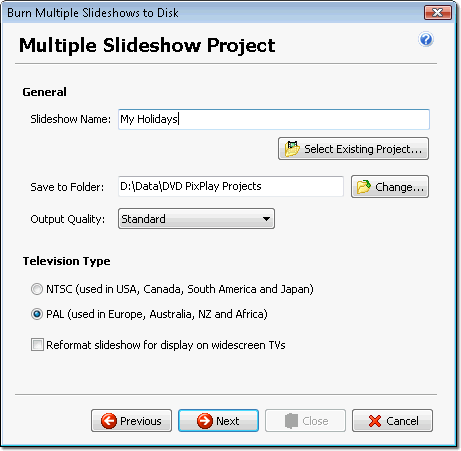
Slideshow Name
Used as a filename and displayed as a heading
on the DVD menu
Slideshow Format
Select your desired Slideshow format:
| DVD: | Native DVD movie format. Compatible with all players that support writable disks |
| PC: | Primarily for creating disk for auto-playback on computers (though some DVD players can display JPEG images) |
|
DVD+PC: |
Creates a combined DVD and PC format slideshow that offers the best compatibility and quality on both PC's and DVD players |
Output Quality
Allows you to specify the output quality of the slideshow. Generally the standard quality is recommended, however if you are having quality problems with the standard setting you should try the two higher quality options.
NOTE:
Encoding with the High quality option will be about 50% slower than Standard
quality. Using the "High Quality with Alternate
Encoder" will be about TEN times as slow
Television Type
You need to specify the destination television format (More Info):
NTSC: Used throughout North and South America and Japan
PAL: Used in Europe, Australia, NZ and Africa
Widescreen: Widen the
output for display on 16:9 TV screens
Click Next to proceed.
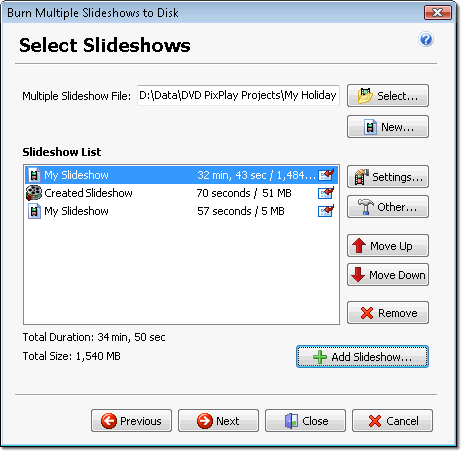
Click "Add Slideshow" to select slideshow projects or video files to add to the disk. You can select from the current slideshow and a list of your recent projects. You can also click "Browse" and select a project or video file from disk. Video files will need to be of a compatible format, such as MPEG or standard AVI (see our support page if you have difficulties).
Click Settings to configure the selected Slideshow:

The name of the slideshow as will be displayed on the DVD menu
Choose one of:
- Return to the main menu
- Replay the current slideshow
- Move to the next slideshow (or the first one if there are none remaining)
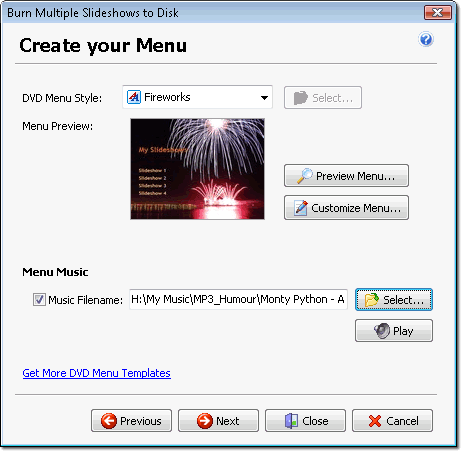
The final step in designing your multiple slideshow disk is creating a menu. The menu is displayed automatically when the disk is inserted into the player and allows the user to select which slideshow to display.
To make menu creation easier, you have three options:
DVD Menu Template: Select one of DVD PixPlay's prebuilt templates and the menu will be automatically generated using the title specified for your project and all of your slideshow files (Extra templates are available).
Background Image: Choose one of your own images and DVD PixPlay will automatically add the menu details using the title specified for your project and all of your slideshow files
Custom: For most control, click the Custom button and design the menu style and layout to your desire. You may also need to create a custom menu if you have added many slideshows to your project (as the templates are limited to certain number of slideshows).
Add a button to your menu that will play all of the slideshows in sequence
Select a music file (MP3, WAV or AC3) to play while the menu is visible
When your multiple slideshow is ready you can burn it directly to DVD.
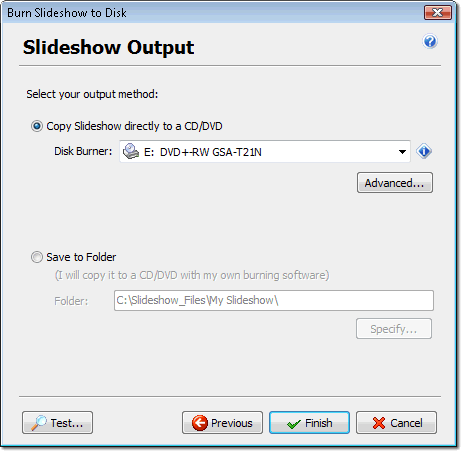
Select your burner from the drop down list or choose a folder to output to. If you have any problems you should review the burner compatibility advice on our support page.
Note: For best compatibility with DVD players, a completely blank disk is required. If you have inserted a disk containing data, you will be asked if you want to erase all content.
|
|
When you are ready, insert a blank DVD and click Finish. |
Also:
